How to Build Wood Wall Panelling Yourself?
Table of Contents
Step 1: The Substructure – Battens
First, a wooden substructure is mounted on the wall.
The boards will later be fixed onto this framework.
Use wooden battens in thicknesses ranging from 10x35mm to 50x80mm (roof battens).
The thicker the battens, the more space for cables or transformers.
Ensure proper ventilation in the substructure – this is especially important in damp rooms, such as bathrooms!
By using vertical battens without top and bottom closure (for horizontally laid reclaimed boards), ventilation is ensured.
Alignment:
If you opt for horizontal installation, mount the battens vertically to the wall. For vertical installation, mount the battens horizontally.
Important: The battens must run at a 90-degree angle to the wall cladding!
Counter-Battens?
A counter-batten is a second layer of battens screwed onto the first horizontal substructure at a 90-degree angle.
This provides more space between wall and cladding and improves ventilation.
Batton Spacing:
We recommend a maximum of 50 cm from batten to batten.
Be sure to keep the chosen spacing consistent.
This is very important for the later fixation of the boards.
Step 2: Attaching the Wall Cladding
After successfully mounting the substructure, the wall cladding can be applied.
Where to Begin?
For horizontal installation, start at the ceiling or floor.
For vertical installation, start with the first board in the corner.
How to Fix the Wall Cladding?
Basically, the method described in Option 1 is sufficient.
Options 2 and 3 have the advantage that no nail or screw heads are visible, even on closer inspection.
Option 1: Wire Nails
Wire nails are nails with a small/flattened head.
They can be nailed directly from the front into the boards and are almost invisible in the wood.
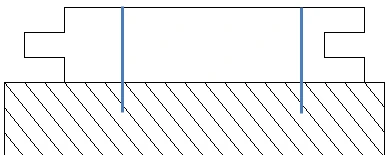
Option 2: Angled Nailing/Screwing
If higher aesthetics are desired and no nail heads should be visible, boards are screwed or nailed at an angle through the tongue and groove into the battens.
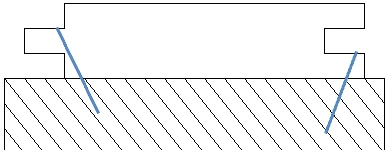
Boards without tongue & groove (trimmed) are also nailed or screwed at an angle into the battens.
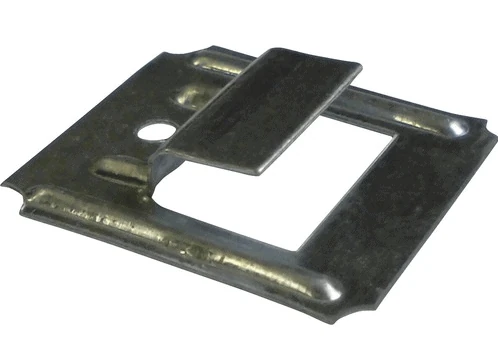
Option 3: Panel Clips (Only for Tongue & Groove)
With panel clips, the boards are not screwed directly but clipped in place.
The boards are “hooked” into the clips. The clip holds the rear tongue edge and fixes the board without damaging it.
For the first and last board, starting and ending clips are used.
Panel clips are available in hardware stores.